
When I first started learning Powershell, like many other technologies, I was self-taught. In this post I’ll share some Powershell quick tips I wish I knew when I was starting out.
This first one may seem fairly obvious, but again this is targeted for those just starting to learn Powershell. Often times peoples interest in Powershell comes up because they need to do some mundane task a bunch of times, and so they turn to their favorite search engine to see if someone has come up with a solution already. The thing to note here is, when you find a solution online most users do not note what version of Powershell the script or module supports. I, myself need to be better about this as well. So how do you check what version of Powershell you have installed, by typing $psversiontable in Powershell.
$psversiontable

Name Value
---- -----
PSVersion 5.1.16299.251
PSEdition Desktop
PSCompatibleVersions {1.0, 2.0, 3.0, 4.0...}
BuildVersion 10.0.16299.251
CLRVersion 4.0.30319.42000
WSManStackVersion 3.0
PSRemotingProtocolVersion 2.3
SerializationVersion 1.1.0.1
One thing to note is that Powershell is backwards compatible, as you can see from the PSComatibleVersions line.
Working with Modules
Powershell was written with the idea that anyone can come up with Powershell Modules to accomplish tasks. At this point Powershell is pretty much an industry standard, such that even Microsoft competitors like Citrix, VMware and even AWS have their own Powershell Moudles. How do you tell what modules are currently available in the Powershell runspace? Get-Module
Get-Module
ModuleType Version Name ExportedCommands
---------- ------- ---- ----------------
Manifest 3.1.0.0 Microsoft.PowerShell.Management {Add-Computer, Add-Content, Checkpoint-Computer, Clear-Content...}
Manifest 3.0.0.0 Microsoft.PowerShell.Security {ConvertFrom-SecureString, ConvertTo-SecureString, Get-Acl, Get-AuthenticodeSignature...}
Manifest 3.1.0.0 Microsoft.PowerShell.Utility {Add-Member, Add-Type, Clear-Variable, Compare-Object...}
Script 0.2.0 PowerShellEditorServices.Commands {ConvertFrom-ScriptExtent, ConvertTo-ScriptExtent, Find-Ast, Get-Token...}
Script 0.2.0 PowerShellEditorServices.VSCode {Close-VSCodeHtmlContentView, New-VSCodeHtmlContentView, Set-VSCodeHtmlContentView, Show-VSCodeHtmlContentView...}
However, there are many more modules available by default, to list those
Get-Module -Listavailable
I’m not going to copy and paste that output cause there’s a lot.
To import any of those modules simply do
Import-Module -name *modulenamehere*
But what if we want to work with a technology and the module isn’t installed? Starting in Powershell 5.0 you can now use Install-Module on internet connection computers to get modules from https://www.powershellgallery.com/
Once you’ve got your module you can list its available commands you can use
Get-Command -Module *modulenamehere*
Working with Powershell Cmdlets
Now that we know how to list all our modules, import them, install new modules and get all the commands within a module, we need to know how to use those commands. Fortunately most module writers provide help documentation directly in their module. To access this information we’ll use the Get-Help command.
Get-Help Get-Service

Get-Help Get-Service -examples

Get-Help Get-Service -detailed

Get-Help Get-Service -full
These four examples will return back various levels of detailed help information about the Get-Service command, where -full returns everything that’s included in the examples and detailed help.
The Powershell Pipeline
In Powershell we work with objects and we also have the pipeline. The pipeline allows us to do a number of things, we can pare down data by using Where-Object, to exporting data to text or CSV files, to running additional commands.
For example, the command Get-Service will return all services running on the machine you run the command on. But what if we only want to return services with specific names?
Get-Service | where-object {$_.name -eq 'spooler'}

Status Name DisplayName
------ ---- -----------
Running Spooler Print Spooler
This took me a long time to really understand, when Powershell objects are piped to a command and use Where-Object with ‘$_’ the $_ is the data we piped from the initial command. Using $_.name we can then search the services by name and find out match to ‘spooler.’
If we wanted to return all running services we could use the same method but change to $_.status.
Get-Service | Where-Object {$_.status -eq 'running'}
What about if we wanted to export those running services we can add an additional pipe and use Export-CSV or Out-File
Get-Service | Where-Object {$_.status -eq 'running'} | out-file c:\temp\example.txt
We can also pare down the data with Select-Object
Get-Service | Where-Object {$_.status -eq 'running'} | Select-Object DisplayName, Status | out-file c:\temp\example.txt
The coolest part about using the pipeline is running second commands behind the pipe. What if we wanted to stop the spooler service?
Get-Service | Where-Object {$_.name -eq 'spooler'} | Stop-Service
We can do something similar in Hyper-V
Get-VM | Where-Object {$_.status -eq 'running'} | Stop-vm
One thing to note is not all commands support pipeline data. In that instance you’ll want to put that data in a variable by declaring a variable and running the command.
$vms = Get-vm | Where-Object{$_.status -eq 'running'}
Powershell Development Tools
Lastly, I want to talk about development tools for Powershell. I would highly recommend at minimum using Powershell ISE, but I definitely recommend getting started with Visual Studio Code.
These tools will help you by providing Intellisense. What is Intellisense? Intellisense offers automatic drop down when the options are available. For instance typing Get-Serv in Visual Studio Code returns this.
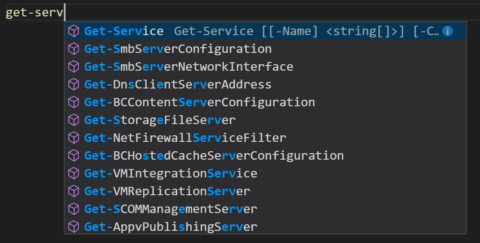
Not only is this finding Get-Service, which is the command I want, its returning commands from all installed modules.
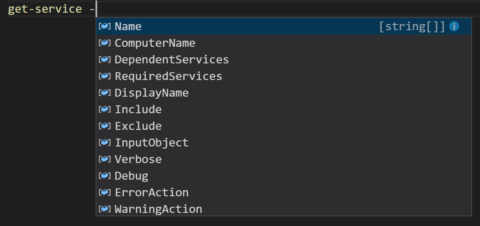
Once we finish the command, Get-Service, and start to build out the command it shows the available options for Get-Service.
Powershell Core 6
This entire post is about some Powershell quick tips in Windows Powershell 5. However, Microsoft announced Powershell Core 6 and there won’t be any new development to Windows Powershell, just bug fixes. So why did I do this post covering Windows Powershell? Powershell Core 6 is the latest and cross platform for Windows, Mac and Linux, but I think its going to be easily five years before we see Powershell Core 6 become mainstream. There are many companies that simply do not stay on the latest and greatest. There are also hundreds of thousands, if not millions of Windows Powershell Scripts in production right now. These aren’t just going to go away over night, nor will they be converted to Powershell Core 6 very quickly.
Another reason is because Azure Automation and Service Management Automation, both of which support Windows Powershell scripts and workflows, currently do not support Powershell Core 6.
Which Powershell to get started with? That depends on you and the environment(s) you work in. In majority Windows environments that have existing Powershell scripts, Windows Powershell is the way to go, learning Core 6 when needed. In a mixed environment and need to automate Linux tasks, Powershell Core 6 is the way to go.
Summary
Learning Powershell can be the best thing for you’re career in IT. Automation of tasks and saving time by doing so is very valuable to many companies. I hope these Powershell quick tips will get you started in your automation journey.